

 MCP Server
- The Databar app in Attio. Enrich records without leaving Attio: run a waterfall or flow on one record, on a selection of records, or as a step in your Attio workflows. Results are written straight into your Attio fields.
- Attio inside Databar. Connect your Attio workspace to Databar to import records into a Databar table, look up records and lists as enrichments, and create or update people and companies in Attio from a table.
Before you start
- A Databar account. Sign up at databar.ai. Every workspace starts with a 14-day free trial and no credit card required. Paid plans start at $99/month.
- An Attio workspace where you’re an admin. You need admin access to install apps and to approve Databar’s permissions.
Part 1: The Databar app in Attio
1. Install the app
- In Attio, open the App Store and search for Databar.
- Click Install and approve the permissions (see Permissions).
2. Connect your Databar API key
1
Copy your Databar API key
In Databar, go to databar.ai/tables, open MCP & API, and copy the key from the top right.
2
Add the key in Attio
In Attio, open the Databar app’s connection settings and paste the key.
3
Test the connection
Open the Databar app’s settings page. Under Databar connection, click Test connection. If the key works, you’ll see a confirmation.
3. Configure waterfalls
The settings page lists the waterfalls available in Attio under Company waterfalls and Person waterfalls:
Click Configure next to a waterfall to choose:
- Results: Map outputs to fields writes each output to an Attio attribute. Save the whole output as a note adds the full result as a note on the record.
- Write rules: what happens when a field already has a value:
- Fill empty fields & append to lists (recommended): fills empty fields and adds to multi-value fields such as email addresses.
- Only fill empty fields: never changes or adds to a field that already has a value.
- Overwrite existing values: replaces what’s there.
- Email verification: for Get email by name & company and Get email by LinkedIn, turn on Verify found emails with ZeroBounce to return only valid emails. Verification can use additional Databar credits.
- Mapping: which Attio attribute each output is written to. Matching fields are mapped automatically. Change any of them, or choose not to map an output.
4. Install flows (optional)
Flows you’ve built in Databar can run in Attio too. Only installed flows appear on records.- On the settings page, under Flows, click + Install flow.
- Pick a flow, then pick the object it runs on. Any object works, including custom objects.
- Under Input mapping, choose which attribute feeds each flow input.
- Under Results, Write rules and Mapping, choose how the outputs are written, as for waterfalls.
5. Enrich a record
- Open a company, person or other record.
- From the record’s actions, choose Enrich with Databar.
- Pick a waterfall or flow. Options the record has data for are listed first. Others are marked Missing data, and the price range is shown next to each.
- Databar runs it, then writes the results using your saved mapping. If there’s no saved mapping, you review each output and its target field first, and can choose to remember the mapping for next time.
6. Bulk enrich records
- In a list or table view, select the records you want to enrich.
- Choose Bulk enrich with Databar.
- Pick a waterfall or flow and run it. Each record is enriched and written using your saved mapping.
7. Use Databar in your workflows
The app adds three steps to the Attio workflow builder:- Add a Databar step to a workflow and choose the waterfall or flow.
- Map each input to a variable from an earlier step, such as the trigger record’s domain or email.
- The step’s outputs become variables. Use them in later steps, for example an Attio Update record step that writes the results to the record.
Workflow steps have a time limit in Attio. If a run is still going after about 100 seconds, the step stops with an error. Retrying the step picks up the same Databar run, so you’re not charged twice.
Part 2: Attio inside Databar
1. Connect Attio
1
Add an Attio source, enrichment or export
In Databar, add any Attio import, enrichment or exporter to a table (see the next sections).
2
Authorize your Attio workspace
In the panel, under Authorization, click Click to Authorize account. Attio opens and asks you to choose a workspace and approve Databar’s permissions.
3
You're connected
You’re sent back to Databar and the Authorization section shows Authorized on Attio. You only connect once per Databar workspace. Every Attio import, enrichment and export uses this connection, and each Attio action shows Authenticated.
2. Import records
Use Import records from Attio to bring people, companies, deals or any custom object into a Databar table. Choose the Object, then run the import. Records come in 500 per page.3. Look up records and lists
These Attio enrichments add columns to existing rows. They’re free.-
In the table toolbar, click the enrichment (lightning) button and search for Attio.
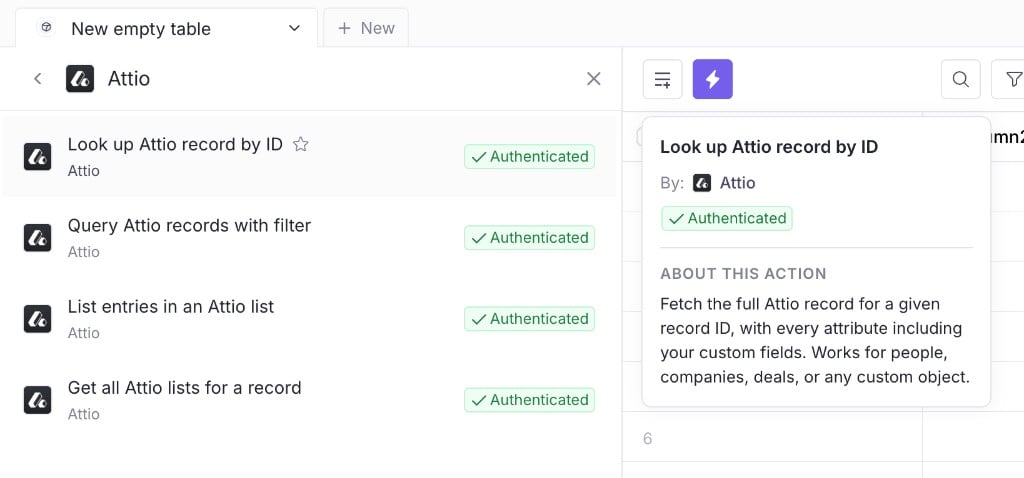
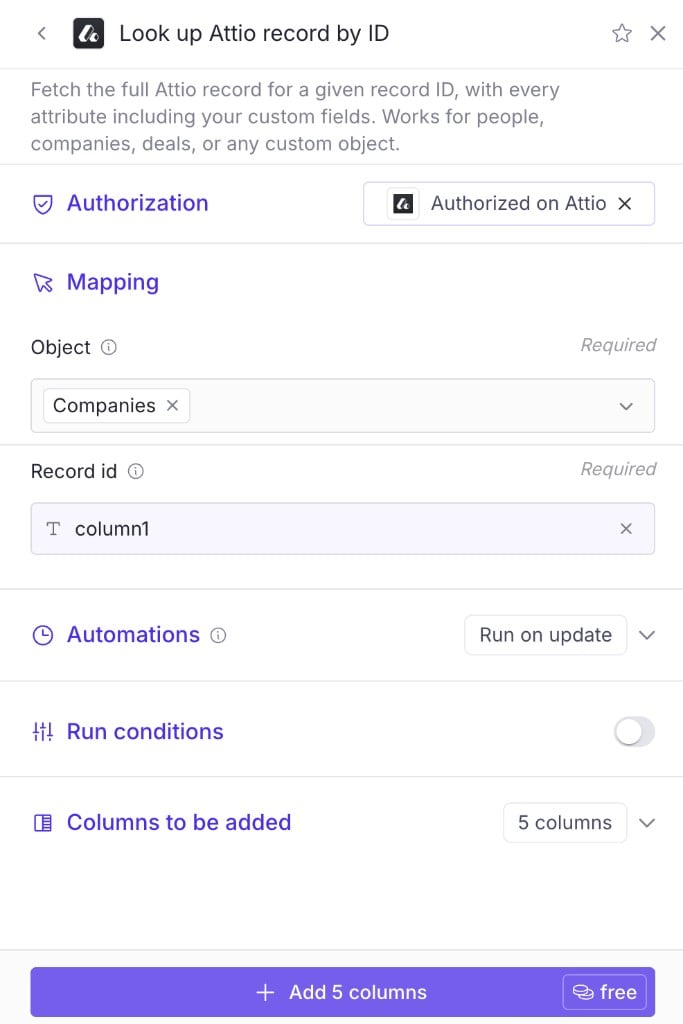
- Pick an enrichment. Under Mapping, choose the Object (for example, Companies) and map the inputs to your columns, such as Record id.
- Optional: under Automations, choose Run on update to re-run when the input changes, or turn on Run conditions to run only on rows that match.
-
Under Columns to be added, check which output columns you want, then click Add columns.
Combine them with Databar’s enrichments and waterfalls to fill in emails, phone numbers, firmographics and more.
4. Send data back to Attio
- In the table toolbar, click Share and Export.
- Under Stream to your CRM, choose Attio, then pick an action:
- Create or Update Company in Attio: matches existing companies by domain, and creates the company if there’s no match. Name and domain are required.
- Create or Update Person in Attio: matches existing people by email address, and creates the person if there’s no match. Full name and email are required.
- Map your Databar columns to Attio attributes. Only the fields you map are written.
- Run the export.
Permissions
Databar requests these Attio permissions. We use each one only for the purpose listed.
Databar doesn’t access Attio in the background. It only reads or writes data when you run an enrichment, import or export, run a workflow that uses a Databar step, or on a schedule you’ve created.
Disconnect or uninstall
Uninstall the app from Attio. In Attio, go to your workspace’s app settings, open Databar and uninstall it. The record actions and workflow steps are removed. Data already written to your records stays in Attio. Disconnect Attio from Databar. Open a table that uses an Attio import, enrichment or export, find Authorization, click the x on Authorized on Attio, and confirm Remove credentials. Imports, exports and schedules that use Attio stop until you reconnect. Data already in your Databar tables stays there, and nothing in Attio is changed.Troubleshooting
"Your Databar API key is invalid or has expired"
"Your Databar API key is invalid or has expired"
Copy a fresh key from databar.ai/tables under MCP & API, paste it into the Databar app’s connection settings in Attio, then click Test connection.
A waterfall or flow shows Missing data
A waterfall or flow shows Missing data
The record doesn’t have a value for an input the run needs, such as a domain, email or LinkedIn URL. Fill in the field, or for flows, check the Input mapping on the settings page.
A flow doesn't appear on a record
A flow doesn't appear on a record
Only installed flows appear, and only on the object you installed them for. Install it under Flows on the settings page.
A field was skipped when writing results
A field was skipped when writing results
The value already belongs to another record (for example, an email address that’s on a different person), and Attio doesn’t allow duplicates for that attribute. The other fields are still written.